김영한님의 스프링 입문-코드로 배우는 스프링 부트, 웹MVC, DB 접근 기술
프로젝트 환경설정
- 프로젝트 생성
- 라이브러리 살펴 보기
- view 환경설정
- 빌드하고 실행하기
강의와 운영체제가 달라서 남겨보는 빌드 순서
프로젝트 생성
* 사전 준비 : JAVA 11 이상 / IDE는 Intellij or Eclipse 설치
- 개인적으로 Intellij의 디자인이 더 마음에 든다. ㅎㅎㅎ (인텔리제이는 유료 무료로 나뉘어 있다.)
* 스프링 부트 스타터 사이트에서 스프링 프로젝트 생성
1) Dependencies (라이브러리) : spring boot web(웹프로젝트), thymeleaf(html을 만들어주는 템플릿엔진) -> generate (파일 다운 받음)
2) 다운 받은 파일 원하는 곳에서 저장 + build.gradle 열기
* 둘러보기

요즘에는 main 과 test 가 기본적으로 설정이 되어있다.
main - java : 이 폴더 안에 실제 패키지와 실행파일이 들어있다.
- resources : 실제 자바 파일을 제외한 (xml, properties 등) 설정파일(모든)이 들어가 있다.
test : test 코드들과 관련된 소스들이 들어있다.
.gitignore : 소스코드 관리
build.gradle : 버전 설정 및 라이브러리 데려오는 것
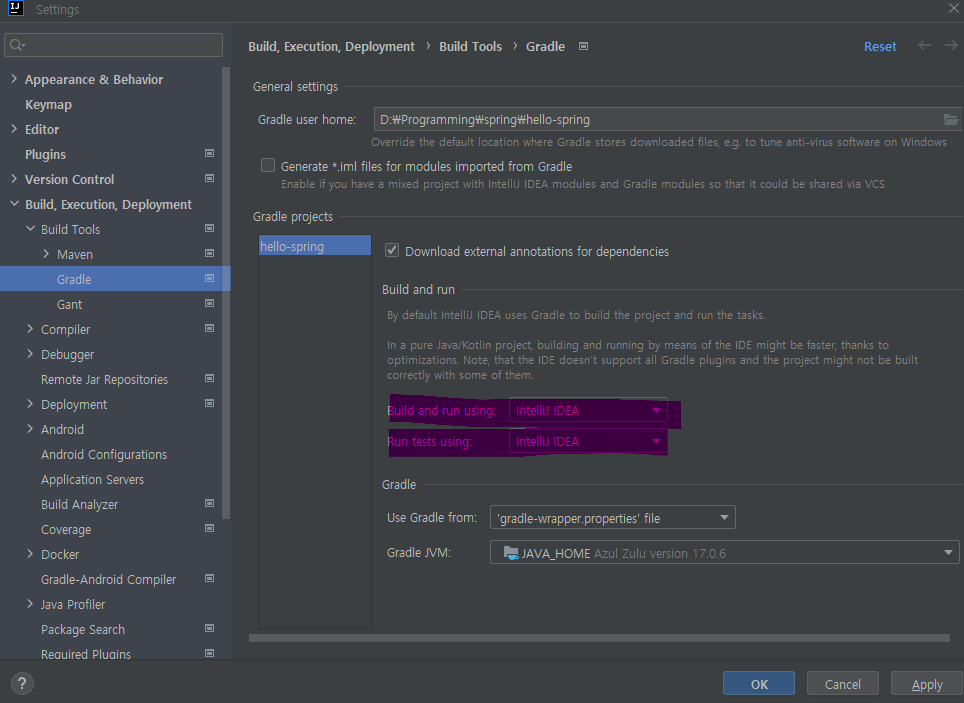
File - Settings - Build - Gradle
build and run using : intellij
Run test using : intellij
로 바꾸면 gradle 통하지 않고 실행 되므로 조금 더 빠르다고 한다.
라이브러리 살펴보기
External Libraries : 가져온 라이브러리들

gradle, maven 같은 빌드 툴들은 의존관계를 관리해준다.
만약 spring boot starter web 이라는 라이브러리를 가져오면 이 라이브러리를 위해 필요한 여러가지 다양한 다른 라이브러리들이 필요하다. 그것을 빌드툴들이 자동적으로 챙겨와준다.
스트링 부트 라이브러리
spring-boot-starter-web
- spring-boot-starter-tomcat : 톰캣(웹서버)
- spring-webmvc : 웹 MVC
spring-boot-starter-thymeleaf : 타임리프 템플릿 엔진(View)
Spring-boot-starter(공통) : 스프링 부트 + 스프링 코어 +로깅
spring - boot (spring - core)
spring-boot-starter-logging (logback, slf4j)
테스트라이브러리
spring-boot-starter-test
junit : 테스트 프레임 워크 ( 4 -> 5)
mockito : 목 라이브러리
assertj : 테스트 코드를 좀 더 편하게 작성하게 도와주는 라이브러리
spring-test : 스프링 통합 테스트 지원
spring boot starter logback
spring boot starter slf4j
찾아보기
view 환경 설정
* main - resources - static - index.html 만들기 (정적 페이지 : 파일을 그대로 읽고 화면에 띄운 것 )
메뉴얼 (필요할 때 찾아볼 수 있어야한다)
https://docs.spring.io/spring-boot/docs/current/reference/html/web.html#web
Web
Graceful shutdown is supported with all four embedded web servers (Jetty, Reactor Netty, Tomcat, and Undertow) and with both reactive and servlet-based web applications. It occurs as part of closing the application context and is performed in the earliest
docs.spring.io
>> index.html 을 static 에서 찾고 만약에 못 찾으면 index template 을 찾는다.
Hello World!
토리맘의 한글라이즈 프로젝트.
godekdls.github.io
스프링에 있는 내용을 한글로 번역했다고 한다. 참고 해도 좋을 듯 :)
* thymeleaf 템플릿 엔진 (정적 페이지의 모양을 바꿀 수 가 있다.)
Thymeleaf
Integrations galore Eclipse, IntelliJ IDEA, Spring, Play, even the up-and-coming Model-View-Controller API for Java EE 8. Write Thymeleaf in your favourite tools, using your favourite web-development framework. Check out our Ecosystem to see more integrati
www.thymeleaf.org
spring boot는 FreeMarker, Groovy, Thymeleaf, Mustache 를 자동 구성해준다.
welcomepage 만들기
welcomepage : 도메인에 들어 왔을 때 보이는 첫 화면
1 ) package 만들기 (hello.hellosrping - controller) + 자바 파일 만들기(hellocontroller)
package hello.hellospring.controller;

import org.springframework.stereotype.Controller;
import org.springframework.ui.Model;
import org.springframework.web.bind.annotation.GetMapping;

@Controller
public class HelloController {
    @GetMapping("hello")  // Map Application 에서 /hello 로 들어오면 이 메서드 호출
    // 여기서의 get 은 get 방식을 얘기한다.
    public String hello(Model model) { // Model : interface 형 선택
        model.addAttribute("data", "hello!");
        // data 는 hello.html 에 key : ${data} 이 부분이고, value : hello!
        // localhost:8080/hello  들어가면 body 부분에 [안녕하세요. hello!]가 출력
        return "hello";
    }
}
2 ) resources - templates - hello.html 만들기
<!DOCTYPE HTML>
<html xmlns:th="http://www.thymeleaf.org">
<!--얘가 있으므로 thymeleaf 를 사용할 수 있다.-->
<head>
    <title>Hello</title>
    <meta http-equiv="Content-Type" content="text/html; charset=UTF-8" />
</head>
<body>
<p th:text="'안녕하세요. ' + ${data}" >안녕하세요. 손님</p>
<!--th : thymeleaf -->
</body>
</html>
3 ) 실행 + localhost:8080/hello
결과

웹브라우저 실행 순서
1 ) 웹 브라우저에서 localhost:8080/hello 호출
2 ) 내장 톰캣이 먼저 확인 및 스프링과 연결
3 ) 스프링은 hellocontroller 에 있는 GetMapping 으로 인해 url에 적힌 것과 매칭이 되는 "hello" 를 찾고 실행
4 ) 스프링이 model 을 만들어서 넣어준다 (getmapping 속 내용)
5 ) key와 value 에 맞게 결과를 return (getmapping 속 내용)
6 ) 컨트롤러에서 return값으로 문자 반환 시 viewResolver가 화면을 찾아서 처리한다.
* spring-boot-devtools 라이브러리 추가 시, html 파일을 컴파일만 해주면 서버 재시작 없이 View 파일 변경 가능
빌드 순서와 실행하기
실행했던 파일은 꼭 끄고 시작하기! ;)
1 ) cd hello-spring
2 ) gradlew bat
3 ) build
4 ) cd libs
5 ) hello-spring-0.0.1-SNAPSHOT.jar 복사 (plain 말고)
6 ) java -jar hello-spring-0.0.1-SNAPSHOT.jar // 이름은 달라질 수 있으니 확인할 것! 띄어쓰기도 확인!
1 ) hello-spring 폴더 들어가기

2 ) gradlew bat 확인하고 실행하기


3 ) build

4 ) libs 폴더에 들어가 "hello-spring-0.0.1-SNAPSHOT.jar" 복사 그리고 작성
장석 방법 : java -jar hello-spring-0.0.1-SNAPSHOT.jar

그러고 나면 쭈루루루룩 뭔가 멋있어 보이는 스프링 글씨가 나타난다 :)
그러면 완성!
cmd 명령어 (윈도우)
cd 폴더명 : 해당 디렉토리로 진입(change directory)
cd.. : 해당 디렉토리 뒤로
dir : 디렉토리 파일과 하위 디렉토리 목록 (directory)
rd : 디렉토리 지움 (remove directory)
taskkill : 실행중인 프로세스나 응용프로그램 중지 (task kill)
'코딩 정리 > Spring' 카테고리의 다른 글
| 쿠키 토큰 세션 캐시 (0) | 2023.04.20 |
|---|---|
| [항해] Spring 숙련주차 #2 (0) | 2023.04.18 |
| [항해] Spring 숙련주차 #1 (0) | 2023.04.18 |